Showing posts with label jazzmaster. Show all posts

Monday, June 15, 2015

I've Spitfired my CIJ Jazzmaster and it is now complete


Ever wonder why modern guitars never seem to look quite right? It's because their pickguards are ugly! Just a swirly brown painted mess. So I've Spitfired my CIJ Jazzmaster:


That's a brand new, handmade tortoise shell pickguard, made the same way the original vintage ones were. It's the closest you're gonna get to the real thing without paying $500 or so. Red Jazzmasters never actually came with these, but it's a common aftermarket look and it was this look that got me into Jazzmasters in the first place.

The contrast in colors on mine is a little strong right now, but that should mellow out over time just as it did on the original vintage guards.

I touched in an earlier post on the fact that modern tort sucks. And there aren't a lot of options for Japanese Jazzmasters - US pickguards don't fit. Spitfire is the only guy making them old-school, with real celluloid patterns churned by hand. And he just started making them fitted for Japanese Jazzmasters.


It's really hard to convey how this looks in person compared to a standard modern printed tortoise shell pickguard. Printed tort has a very "2D" look - it looks like the piece of paper under plastic that it is. A real hand-churned pickguard, though, has truly random patterns all through the material - it has a real depth to it.

Here are a few comparison shots with my old Allparts pickguard still on:


Below is Spitfire, US AVRI, and Allparts top to bottom:


Spitfire and US AVRI below - what is Fender US even doing these days?


Spitfire, US AVRI and Allparts again:


I chose "Vintage Burgundy" for color and "Speckled 60's" for style, because my research showed that that was closest to what was most common in 1966, the year my guitar was based on. Don't like the big splotches of color? Pick "Subtle 60's" instead of speckled. Want something even more dramatic? Go for "Crazy 70's" or even "Solar Flare". Color options also range from "Faded Orange" to "Vintage Dark". The truth is there's no one "right" look if you're trying to replicate vintage - it depends on when a vintage pickguard was made, which individual person made it and how it's been treated since then. Spitfire seems to cover all the possible combinations.

But they all share one thing in common - that look that says you're standing in the middle of an exploding fireball. You just don't get that from printed tort.

Notice too that Spitfire's now using vintage-correct 4-ply thin black line material cut to a wider angle - a seemingly tiny detail that really makes the edges pop (see above!).


Spitfire's pickguards do not come with any sort of shielding material, so on a Japanese Jazzmaster you have to make your own. Whenever you replace your pickguard, do not neglect this step. But I'd protect that signature just in case!


I used the same shielding tape I bought to shield my Jazzmaster's inner cavities. This is probably the best option for a Japanese pickguard, because again, US pickguard shields don't fit and Fender Japan doesn't make one - they use even thinner silver foil tape on their factory pickguards.


Here is it done and trimmed. Truth be told I don't like a lot of wrinkles in my tape and I tried to smooth it out as much as possible while replacing some strips that were even worse than that bottom left corner. (This tape is difficult to keep completely wrinkle-free as you work with it.) Wrinkles that are too deep nearest the edges can leave indentations on your finish over time.

Trimming the tape is tricky - I used an X-Acto knife to trim as close to the edge as possible. I'm sure I scored the back of the pickguard a bit, but who cares - if I ever do sell this, whoever buys it is gonna want that shielding anyway. You need to trim right up to the edge, since you want the pickguard shielding to contact the inner cavity shielding and form a Faraday Cage.

After that, the rest is easy - unstring the guitar, remove the bridge, unscrew 15 screws, remove the knobs, and use a pliers to remove the nut on the pots, switch and jack. Then do the same in reverse. It sounds like more work than it is.

I took the opportunity to replace the rubber gaskets I mentioned at the end of this post with metal washers, as suggested by one of my commenters. I don't know if it made any difference but I had started to notice a bit of buzzing coming from somewhere and I didn't like it.

Outdoor photo of the new guard installed!


This guitar has been an amazing project guitar and I'm almost sad to report that there's just nothing left that I can do to it. All the parts that I *can* change, I have - and in every case, with top of the line replacements. There are just no upgrades left to do, whether functional or cosmetic.

It is at this point, in all honesty, one of the best guitars I've ever played. I have no way to improve it further, and consequently I'm not sure I'll ever write about it again.

But don't worry - there's a new addition to the stable coming this week. More on that soon!


Tuesday, April 28, 2015

The state of the (CIJ) Jazzmaster, April 2015

In memoriam of Fender Japan's closing and in recognition that it's been a while since I posted about it, here's the current state of my Japanese Fender Jazzmaster:


Added a tortoise shell pickguard, and re-added the "aged white" pickup covers that I'd tried out and previously removed.

This is more or less the look that I originally wanted back when I bought this guitar in 2007, but I ended up a little bit smitten with the mint pickguard it actually came with. Still, literally the entire reason I wanted a red Jazzmaster with matching headstock was this:


That's one of Kevin Shields' Jazzmasters, as normally played by Bilinda Butcher in My Bloody Valentine. See it in action in the "Soon" video here:


His, of course, was a vintage Jazzmaster with a vintage pickguard - and as anyone will tell you, most modern tortoise shell looks absolutely nothing like vintage. I have a Japanese Jazzmaster which further limits my options. (An American pickguard will fit with some slight mods, but I don't want to drill either into my guitar or into a vintage pickguard.)

My pickguard above is from Allparts. Yes, Allparts pickguards fit Japanese Jazzmasters without mods - in fact, except for their gold pickguard, that is all they fit. The template they use for most of their guards is Japanese, whether they even know it or not.


It is tough to find decent pictures of tort pickguards online (somehow they all end up a blurry mess), so here's what's hopefully a pretty good shot of the Allparts tortoise shell. It is printed tortoise, meaning there's a clear layer of plastic over what's probably a piece of paper with a tortoise pattern printed on it. From far away it looks okay, but up close it's pretty obvious that there's no depth to it. It's very "2D".

This is true of a lot of modern tort, including Fender Japan's official tort pickguards. (Their early pickguards were red printed like this, although I think the Allparts looks better. Their later tort pickguards were brown, but still printed.) Fender's new US pickguards don't look printed, but they're also not "real" tort - they look like they're made with some variation of the swirl painting technique, the same way their "bowling ball" guitar finishes were made.

There's one guy who's figured out how to make real celluloid tort again, just like the vintage stuff, and his nom-de-plume is Spitfire. If you want a vintage-looking pickguard without spending $500+ for one, he's your guy - as long as he's got a template for your guitar. A long time ago in a thread on a guitar forum I read he posted this kind of amazing video about pens, and it seems like that set him off and running. This is how you make real tort:


I'm literally counting the days until he sorts out his Japanese Jazzmaster template, which he's apparently in the process of doing. My Allparts guard is a placeholder.


I'm not sure if you can tell (it's more obvious in the photo at top), but in person I still feel like the pickup cover color is off. See, those knobs there aren't the modern reproductions - those are real vintage knobs from 1966. That's the color they've faded to, not the yellowish brown that Fender's "aged white" really is. Granted, not everything would have discolored at the exact same rate, but usually most of the plastic on any guitar matches.

The stark white Mojotone covers I had, though, didn't look right either on a tort pickguard. I felt that way with my AVRI also; tort needs something a little softer.


My phone whitened up the pickup covers in this photo - damn, I still think this is a beautiful guitar. Just can't wait to slap a Spitfire guard on it!

Tuesday, May 28, 2013

Fender Jazzmaster Pickup Covers - the details of the Jazzmaster look

Today I want to talk about a subject near and dear to every Jazzmaster owner's heart: pickup covers! This will hopefully be the definitive post on the subject, and more info than anyone could ever need.

Sunday, May 05, 2013

Upgrading ALL Fender Jazzmaster wiring and electronics in one shot

(I'll finish my Japan trip report up shortly; I just want to write this up while I'm thinking about it.)

Today I'm working on my Japanese (CIJ) Fender Jazzmaster, surprisingly one of my most popular subjects here! I know other people have found my DIY tips helpful. I've already upgraded the pickups, tremolo, added shielding and Loctited my bridge. Now I've decided that if something's worth doing, it's worth overdoing - I'm just going to go ahead and upgrade all the wiring and electronics.

Tuesday, March 05, 2013

Adding a gold pickguard to a Fender Jazzmaster

Today, my American Jazzmaster looks like this:

Hawt. But let's look at how we got here, and why.

Until this weekend, this guitar looked like this:

I'll bet some people like this better, but I don't. It's a classic look, yeah, but not everything classic was better. I like tortoise shell pickguards on sunburst, but not on black. I got a black Jazzmaster knowing I'd eventually mod it. Mint looks pretty good too, but I already have a Jazzmaster with a mint pickguard, so I wanted something different.

I had black and gold in the back of my mind for a while. I didn't really know where the idea came from, until one day I remembered Tom Verlaine playing this at the 50th Anniversary Jazzmaster concert my wife and I went to a few years ago:

It was a Fender Custom Shop guitar made just for him - of 12 made for that concert, it was the only one in black. All the others were sunburst. This was my inspiration.

Here's what I used:

Allparts gold anodized aluminum pickguard, black plastic parts sourced from Ebay. The seller of the plastic parts claimed they were "all original Fender parts", but that can't possibly be true because they don't make black Jazzmaster pickup covers. I'm sure they're also Allparts. The knobs and tips might be Fender - they make these for Strats, which share some of the same parts.

Allparts is really the only decent source for a new American JM gold aluminum pickguard. Incidentally, this is what the very earliest Jazzmasters came with - not tort, gold. (But not the black ones, which came later. Still, everything looks better with gold.) The proper Jazzmaster pickguard material is metal.

Here's my old tort pickguard. Fender's reissue tortoise shell has gotten a lot better over the years. It's now pretty close to vintage in both color and figuring. Earlier reissue pickguards were like vomit. I'll keep this one around in case I ever want to put the guitar back to stock.

Underneath the pickguard with everything but the pickup covers removed. The blue tape is my own.


The distinctive AVRI pickups.

My guitar has to be one of the few AVRI's without a date on it anywhere. I hope this isn't a problem for me later on, but my neck date has been rubbed out (at the factory - you can still see a hint of it, but can't make out what it says) and all the other areas where dates can be written (pickguard shield, brass shielding tubs, etc.) are blank. I'm sure it's a 2012 but I have no idea why Fender would do this. They probably just forgot, or got lazy in the last year of production for these 1962 reissues.

First task is the new covers. Easy... these fit like a glove.

Next task is the pickguard itself. Unfortunately I had a couple issues with this pickguard.

Issue #1:

I noticed this gap down on the bridge side caused by the pickguard resting on top of the bridge thimbles. No amount of fiddling with it could get rid of this. I finally realized the problem was actually at the neck:

It's simply cut wrong. There's not enough space between the neck cutout and neck pickup. I tried sanding it, but this is a metal pickguard. Time to bring out the big gun...

I hated to do it, but sometimes you gotta get serious. I shaved off about 1/10" of metal near the neck - barely anything, but enough.

Issue #2: I didn't get pics of this, but the rhythm switch and roller knob bracket screws are threaded for a thicker pickguard, meaning these parts kind of just flop around if you don't shim them somehow - and they'll stick up too far if you get shorter screws. I got lucky and found a little pack of tiny rubber washers in my basement - I cut them in half lengthwise with a razor blade and that made them the perfect thickness and material to act as a shim underneath the pickguard.

Issue #3: I scratched the guitar all up with the pickguard while I was doing all this! I used some of my Guitar Scratch Remover polish to clean this up. This is a metal pickguard with sharp edges - it's like taking a box cutter to your guitar.

The last task is just replacing all the knobs and tips. The tips unscrew like nothing, and the knobs just press on. I didn't get the chrome Telecaster knobs like on the Tom Verlaine guitar, but I might someday. I kinda like actually having numbers, though.

The end result, once again:

Yessir, I like it. Now I feel like my American Jazzmaster is really mine. I feel a connection to it like I feel to my Japanese Jazzmaster.

UPDATE: I forgot to talk about one of the most important parts - grounding. Fail to properly ground your guitar and you will have loud buzzing. With a gold pickguard this is a little different - you don't need a pickguard shield at all, but you do need to scratch the anodizing off around the holes on the underside:

That's all I needed - it doesn't take much, but the anodizing acts as an insulator so to properly ground the pickguard and all components, they need to be touching bare metal.

I highly, highly recommend a multimeter to test for ground. They're $20 and easy to use. The main ground wire on American reissue Jazzmasters goes to the bridge thimble, so here I am testing the pickguard (on the part near the neck that I'd already sanded off earlier) going to the thimble. That confirms the pickguard itself is grounded.

Don't forget to check the jack, pots and switches too. On most Jazzmasters, the rhythm switch, for example, gets its ground from the pickguard shield. I just sanded under everything but the roller pots - that assembly has its own ground wire going to the shielding on my JM, so I left it alone. Once I was done, I tested everything with the multimeter, then rested the pickguard on the guitar, strung up one string and tested that everything worked properly through an amp. With that verified, I screwed everything back together and restrung.

Don't skip any steps!

Monday, January 28, 2013

New Fender Jazzmaster! AVRI 1962 reissue

Next month is my and my wife's 10 year anniversary. In honor of such a special occasion, she's given me this:


(I'm giving her a ring. Don't worry, she knows.)

It's a Fender 1962 American Vintage Reissue Jazzmaster. Pretty much the last one anywhere in the United States that we could find - they've been replaced by the 1965 version that's almost the exact same thing for nearly $1,000 more. Fender's really gotten ridiculous. I was lucky to find this, even though black wasn't my first choice. I'm warming up to it, though. Maybe I'll throw a gold pickguard and black pickup covers on there at some point.

I've wanted an American Jazzmaster for seriously like 25 years, ever since I first saw My Bloody Valentine using them (and then pretty much every other favorite band I had in the early 90's). Sure, I've had my Japanese one for almost 6 years now and I love it, but I always wondered what I was missing and had a little bit of an inferiority complex about it. So this is seriously like a dream come true for me.

I'll have a lot more on this later, including a big comparison between my Japanese and American Jazzmasters, and a little disappointment I had upon receiving this that's thankfully now been rectified. All that soon!


(There's no actual size difference; the American one is slightly closer to the camera.)

Monday, January 07, 2013

The state of the Jazzmaster, January 2013 - shielding, witch hats and more!


It's no surprise to me that my most popular posts all deal with certain pretty specific themes - what's probably more surprising is that I know this yet keep writing about other stuff that only I seem to care about.  Anyway, over the years I've written a few posts about tinkering with my Japanese Fender Jazzmaster and they still get tons of hits (they're way up in the Google search results).  So I figured I'd post a little update on what I've been doing with it lately.

First, I have done one fairly major project that I hadn't yet written about (mostly because the results were a bit disappointing):


I shielded the entire pickup and control cavity using copper shielding tape. Why? Well, Japanese Jazzmasters ship with some pretty low output pickups - around the 4-5 ohm range. Because of that, they can get away with using black shielding paint rather than a real metal surface (vintage Jazzmasters shipped with solid brass tubs for shielding). This saves on both weight and cost.

But after upgrading to the Seymour Duncan Antiquity II's, which are closer to 8 ohms like a vintage JM pickup, I had definitely noticed an increase in hum. So I decided to shield it like a proper Jazzmaster. There shouldn't be any real difference in the effectiveness of shielding tape vs. the brass tubs, so I went with tape to add a minimum of extra weight. In case you're interested in doing this yourself, here's what you need:


The soldering iron is in case you need to do anything special with your grounding - I didn't, but some people like to specifically ground the shielding itself (you shouldn't really need to if you apply the tape correctly), or solder each piece of tape together. The sandpaper is similarly kind of optional - I used it both to sand down rough spots where the tape wasn't adhering, as well as on my pickup covers (more on that later). The pickup foam you need because you're going to throw out your old foam. The strings are because duh - you're removing your strings to get in there, may as well put on some new ones. And the multimeter's to check for connectivity all around - the tape needs to make a circuit, so the last step of the process is to check all over to make sure every part of it is electrically connected to every other, and it's all grounded.

You also need this - conductive copper tape from Stew Mac. The nice thing about this stuff is that the adhesive is conductive, so there's really no need to worry about soldering the tape itself together (as you need to with lesser copper tape).

Make sure you tape up over the lip around the edge - that's how you get a grounded circuit, because the shielding then is in contact with the pickguard foil. (Incidentally, I had to peel some of mine back after taking that photo, because the pickguard is right up against the edge of some of the body routings and the tape ended up sticking out in a few spots.)

So, does it work? Ehhhh. It's hard to say - it's still a single coil guitar, it's never going to be totally silent in the bridge or neck positions. (It's silent in the center position, where it acts like a humbucker.) I'm a little disappointed that there's about as much hum still as my Squier Strat, which has no shielding at all - not even paint. Then again, the Strat has much lower output pickups. The Jazzmaster's always been a hot guitar, output-wise.

So what was I doing on this night, with a screwdriver, multimeter, soldering stuff and more pickup foam?


Check out that weird reflection of the ceiling that makes it look like I've got some wild finish checking. (I don't.)

I reopened the thing up to check for "cold joints" in my pickup installation to make sure that wasn't the source of my hum. After resoldering one suspicious joint, I'm confident now that everything's tight.


That's a bad joint - the black wire's just kind of resting there, with some ugly looking solder holding it on and conducting all the current. Make sure you don't do this. I fixed this by desoldering it, then making a mechanical connection, then resoldering properly. Still have hum in single pickup config, though. Like I said, it's a single coil guitar. This is as good as it's gonna get!

I also wanted to raise my pickups a bit because one other quirk of Japanese Jazzmasters is that the pickup cavities are a little deeper than the American ones, so if you buy American pickups, the foam isn't going to push them out far enough.


By the way, check out that label. The official Fender Jazzmaster pickup foam is even listed as "weatherstrip" foam right on the label. If you're a purist about only using Fender foam, forget that - just go to the hardware store and buy some weatherstripping. It's what Leo would have done.

I actually didn't end up using this because I wanted to keep one package of foam sealed... for some reason. I'm kind of a hoarder. Instead, I carefully detached my old foam, cut a couple pieces of the stuff below in half lengthwise (so it's half this height) and then stuck it under the "official" pickup foam:


That's just high density rubber foam weatherstripping from Home Depot. At half height, when combined with the regular pickup foam, it ends up being perfect to push out the pickups to the required height.

Here's one other thing I did when I initially shielded the guitar:


Maybe a little hard to see but that's kind of the point - I fully sanded the finish off my pickup covers using that 600 grit sandpaper. They now have a totally smooth, matte feel to them that doesn't shine and is aging very quickly and very nicely. I said before that I don't like the look of the American reissue pickup covers - they're too dark and too shiny and just look weird, not like a real vintage cover. Well, unless you look right up close, these are already starting to.Without the protective finish, they're no longer a stark white but more of a cream color, and I just like the matte look of them too. Compare the color of the pickup covers to the real vintage knob next to it. Which brings me to...

Witch hats!


Witch hat knobs really should be on any "1966" reissue guitar - Fender Japan doesn't include them because they don't make them in general, and they obviously don't want to make them just for the Jazzmaster. Mine are real Fender new old stock from the 1960's - these are getting really hard to find and aren't that cheap considering they're freakin' KNOBS. You can see that mine are slightly mismatched - I may do something about that sometime, although this is certainly something that might have happened naturally to a real guitar from the 60's.  These knobs were just from different batches, and maybe even different years - one came to me still in the original sealed bag (oddly enough, the more discolored "tone" knob - that's real UV aging!), the other was obtained through a nice guy on the offsetguitars.com forums, and they've aged at slightly different rates.

The best way to quick-age old Fender plastic parts is to let them sit in some room temperature (not hot!) tea for a while - I may do that with my volume knob, or I may just leave it because it's not that noticeable, looks like plausible aging and it's just as likely I'd overshoot with the tea method and end up with mismatched knobs anyway.

btw, yes, they fit on CIJ/MIJ Jazzmasters, though they don't turn in a perfect circle (they're slightly off-axis) due to the smaller pot shafts. Again, not that noticeable, and you can always change the pots if you want.

At this point, I'm reaching diminishing returns with anything further I do to this Jazzmaster. About the last thing left is to just replace the remaining wiring and electronics, and I probably will do that sometime - although for me, it's mainly a vanity thing so my knobs turn in a perfect circle and I'll know in my own head that I have wiring "as good" as any American JM. But in terms of sound, playability and even look, I can't imagine how I'm going to improve this thing any further. It's a beautiful looking and sounding guitar (with literally the best neck I have ever seen) and I would 100% gig with it as it is.

Now on to fixing up my new Gretsch 5422T!

Monday, February 06, 2012

CIJ/MIJ Fender Jazzmaster tremolo upgrade

Another in my surprisingly popular series of posts dedicated to the Japanese version of Fender's most famous "forgotten" electric guitar! How oddly specific.

One of the easiest upgrades that owners of Japanese (CIJ/MIJ) Fender Jazzmasters can make is the tremolo unit, aka the tailpiece. The tremolo in Japanese Jazzmasters is kind of a weak point in these mostly excellent guitars (another is the pickups), but luckily, it's really easy to just drop in an American one.


What you need:

* Fender USA Jazzmaster tremolo unit part #0054466000
* Fender USA Jazzmaster tremolo arm part #0054473000
* If you don't have any, you also need a Stratocaster tremolo arm tip (the Japanese one won't fit. See part #'s here, depending on color).

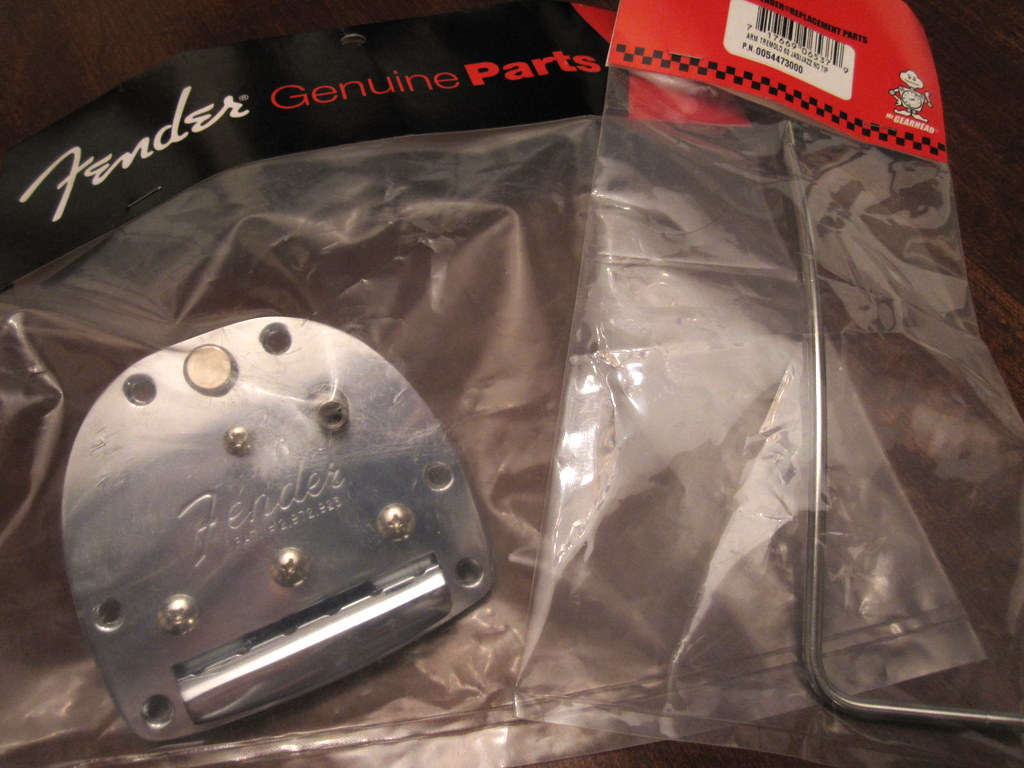
I found my trem unit and arm on Ebay; they can be hard to find. (Ironically, real vintage ones seem to be easier right now.) Many reputable stores that used to have them seem to be perpetually sold out these days (e.g. Angela.com). Be sure you're actually buying a genuine Fender USA unit; there are a lot of cheap imports out there, many of which are labeled as "for" American Vintage Jazzmasters. That's not the same as saying they are American Vintage Jazzmaster tremolos. You really need to be careful. The label should look something like this:


None of the cheap imports is an upgrade over Fender Japan's tremolos, which aren't that bad as it is; the only real upgrade is an American one. One clue you've found an American unit (though definitely not a foolproof one) is the price - a USA tremolo should be around $60 just for the unit, and $10-$15 more if it comes with the arm. The imports are almost always priced much less than that.

Onto the surgery! Here's a Japanese tremolo unit in place:


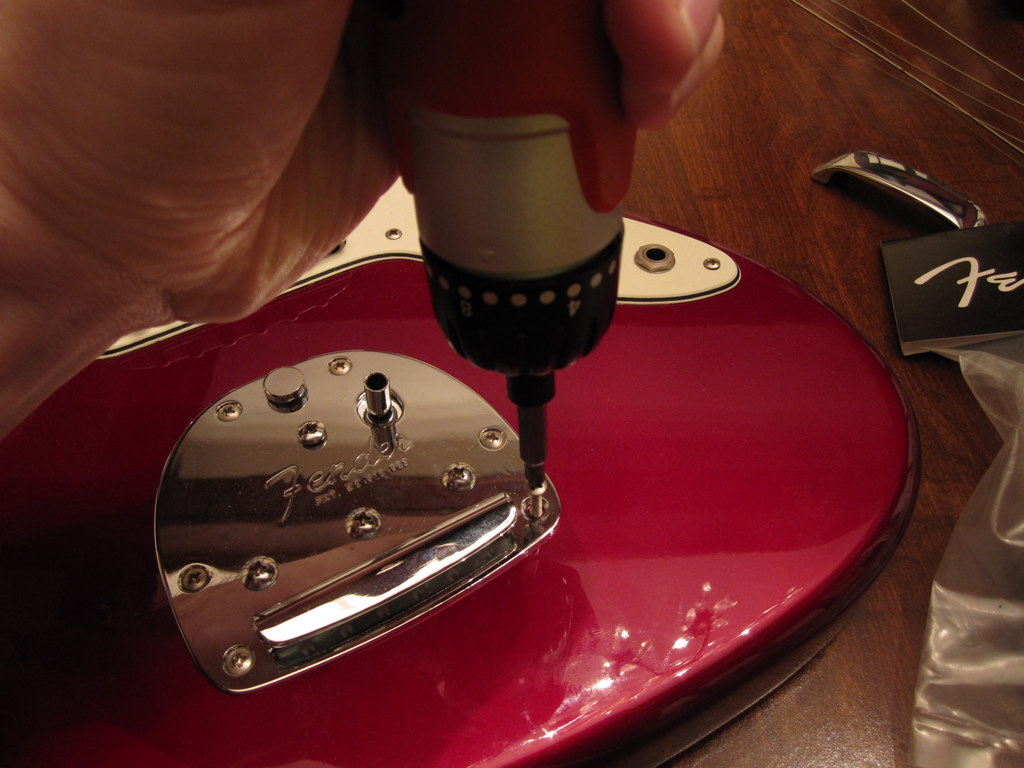
Remove all the strings and the tremolo arm (it will be tight, but just grab it at the bend and pull straight out) and unscrew the tremolo unit, making sure to only unscrew the screws along the outside edge:


Here's what it looks like ready to come out:


And it's out! 


If you're lucky (like I was), it won't stick. If it sticks, just try to figure out where it's sticking and gently pry it up with your fingernail if you can. There's nothing holding it on but the finish at that point, so you just want to try to avoid chipping the polyurethane when you pull it out.

Here are the two units side by side - let's play spot the differences!


There's no size difference - they kind of lay at different angles so there's a perspective effect in that photo.  But, there are some actual differences:

* The lock button is nickel-finished on the US unit, the Japanese is chrome
* The metal on the collet (the part that holds the arm) is thicker on the US unit
* The collet hole is round on the US unit, and oval on the Japanese
* Oddly, the Fender and patent number typefaces are slightly different


A more functional difference: the string spacing is correct on the US version, and incorrect on the Japanese.


The base plate is slightly thicker on the US version. Honestly, though, it's not a huge difference, and both units are pretty hefty. (It may even be slightly exaggerated here; it looks like I may have been holding the US unit closer to the camera without realizing it.)

Here's the underside:


US is on the left; Japanese on the right. Again, there are some differences, but they're not really that dramatic. The US one is slightly chunkier in general.

Here are the arms:


US on the bottom, Japanese on top. The US one has a smoother bend and a little less of a shiny chrome finish. Different arms do have different bends so I don't know if this is representative overall. I've seen some goofy looking US arms.

More importantly, the US arm is a little thinner and has screw threads for the tip. A Japanese arm won't fit in a US tremolo, and neither will a Japanese tip fit on a US arm. I had actually jammed a US tip onto my Japanese arm so I was able to just reuse that; it hadn't deformed it too much. (And I had "aged" it in tea myself, so I was happy about that!)


Reverse the process laid out for removal and... done! When you put in your arm, be sure to press it all the way in. Many people are afraid to do this and end up with floppy arms and a sloppy-feeling tremolo and wonder why. Kevin Shields famously used to leave his arms hanging out for a bit more height, but he actually used to have to tape them to the tremolo collet so they wouldn't fall out.

This is all really a five minute procedure - I spent way more time taking these photos for this blog post. Be sure to set up your tremolo after installing it! (The trem arm will probably be very close to the strings if it's really set up properly for the trem lock - I usually keep mine adjusted so the tip is a bit higher, even though it makes the lock useless.)

So, does it feel different, and is it worth it?

As a cheap upgrade, I think it's worth doing. Honestly, I think the Japanese tremolos are not bad, but the US ones are slightly better. Japanese tremolos do feel a little "loose", in that there's a little play in the system where you can press the bar down a half inch or so before it "catches", and if you're hard on it, it'll do so with an audible click. And it does this every single time. I'm not sure what causes that (probably the collet itself), but it doesn't seem to be present in the US version. Also, it's nice to have the correct string spacing, which means the strings aren't being pulled both vertically and horizontally against the bridge saddles. That can lead to broken strings - not a good thing. It also reduces sustain.

I don't actually believe there's anything wrong with the metal itself, or the spring in Japanese tremolos, as some do. My US tremolo doesn't feel any "stronger" than my Japanese did. But it does feel a bit smoother, and I have more confidence in my string longevity, and I do believe I am getting more sustain. Of course, it's hard to objectively measure any of that. But I believe it to be true.

My next upgrade: new shielding!

About This Blog

This is increasingly not a blog about Alphabet City, New York. I used to live in the East Village and work on Avenue B, but I no longer do. Why don't I change the name if I'm writing about Japan and video games and guitars? Because New Yorkers are well-rounded people with varied interests, and mine have gone increasingly off the rails over the years. And I don't feel like changing the name. I do still write about New York City sometimes.

Followers

  © Blogger templates The Professional Template by Ourblogtemplates.com 2008

Back to TOP